Whether you’re a Bluebeam beginner or a seasoned expert, we all have gaps in our knowledge. Tuesday Tidbits will help you fill in those gaps. Every Tuesday, I’ll teach you simple techniques that you can learn in under 10 minutes and implement immediately to improve your workflow.
Intro
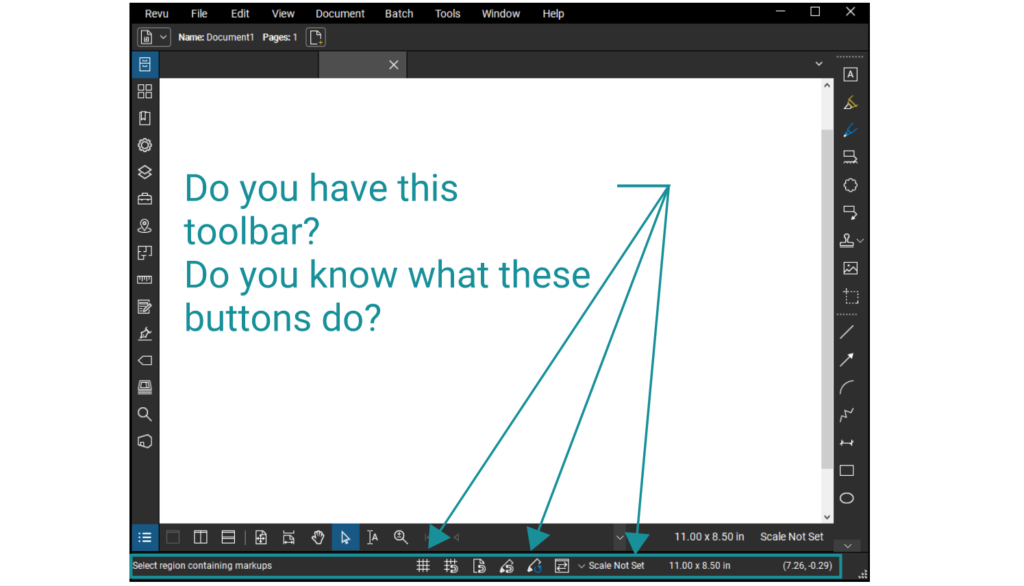
Wanna know something I learned literally 5 minutes ago? You can turn the Status Bar on and off using the F8 key.
I’ve never really needed to know this because for me and all my coworkers it’s turned on automatically when we start Bluebeam. That’s how I set up our company-wide profile is set up (more about profiles in a future post).
But, if you have a fresh install of Bluebeam that you haven’t fussed with at all, this toolbar might be hidden. It has some really useful and, dare I say, vital tools that you might not know existed. And they’re right at your fingertips once you turn on the Status Bar, not buried in a seemingly endless series of menus and submenus.
Turning on the Status Bar
I mentioned this in the first sentence of this post, but you can turn on and off the visibility of the Status Bar by pressing the F8 key. The menu will appear at the very bottom of the screen.
Tools in the Status Bar
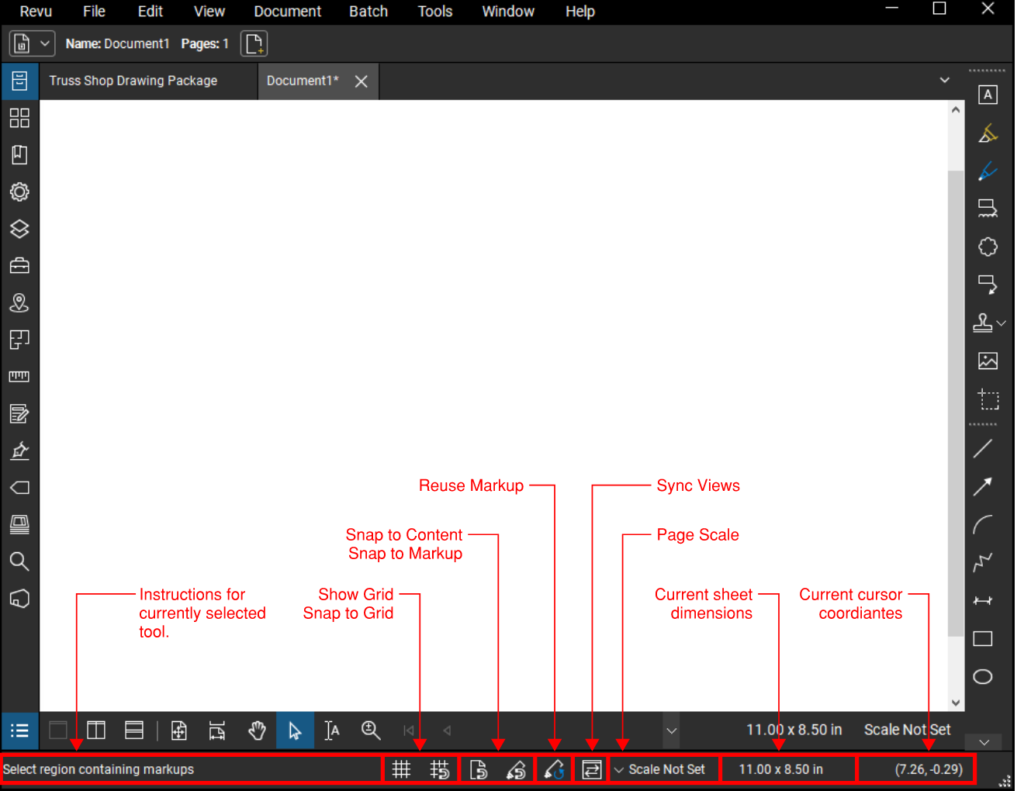
Show/Snap to Grid
Show Grid ![]() and Snap to Grid
and Snap to Grid ![]() function similarly to the AutoCAD features of the same name that I’ve never actually seen anyone use. Basically, you can turn on a dotted grid for sketching purposes and have all your markups snap to that grid.
function similarly to the AutoCAD features of the same name that I’ve never actually seen anyone use. Basically, you can turn on a dotted grid for sketching purposes and have all your markups snap to that grid.
Snap to Content or Snap to Markup
Snap to Content ![]() will snap a new markup to any content in a PDF that was created using Revit or some other drawing/modeling software (ie not a scanned document). The cursor will become “sticky” when it gets in close proximity to content, and it will get even “stickier” when you get next to end points or midpoints of lines or circles.
will snap a new markup to any content in a PDF that was created using Revit or some other drawing/modeling software (ie not a scanned document). The cursor will become “sticky” when it gets in close proximity to content, and it will get even “stickier” when you get next to end points or midpoints of lines or circles.
Snap to Markup ![]() will snap to any Bluebeam markups you create within the PDF. This behaves similarly to Snap to Content
will snap to any Bluebeam markups you create within the PDF. This behaves similarly to Snap to Content ![]() , with the extra bonus feature of having “guidelines” to help you align with other markups elsewhere on the page.
, with the extra bonus feature of having “guidelines” to help you align with other markups elsewhere on the page.
Reuse Markup
I went over this tool previously in my post Double Click to Re-Use Markups. It does exactly what it sounds like it does.
Synchronize Views
If you have split drawings or drawings on two different monitors, you can use Synchronize Views ![]() to synchronize their views (I’m good at explaining stuff!). If you move or zoom on one drawing, the other drawing will move and zoom to match.
to synchronize their views (I’m good at explaining stuff!). If you move or zoom on one drawing, the other drawing will move and zoom to match.
Click the little arrow next to the tool and select either Document or Page. Document will switch pages as you do, matching page 1 to 1, 2 to 2, etc… Page will only synchronize the views, it will not switch pages across documents.
Page Scale
You can view the current page scale, but also, if you click on it, you can set or update the current page scale if needed.
Conclusion
In my opinion, I think the Status Bar should be on by default. Like, why would ever want to turn it off? These tools are really useful and I hope you’ll use them in your everyday workflow now that you know where to find them.
Good information as always Liz! I too leave the status bar on all the time, but it’s good to know a simple trick to get it out of the way incase you need that little bit of screen space at the bottom.
Pingback:Split Screen (aka MultiView™) – Bluebeam Tips and Tricks
Pingback:Dimensions, Scaling, and Viewports – Bluebeam Tips and Tricks
I love adding my most used tool chest to the navigation bar since I am constantly opening and closing that side panel.
Wow I am silly, I didn’t even know about the status bar
Pingback:Quick Drawing Comparison Using Overlay Pages – Bluebeam Tips and Tricks