Whether you’re a Bluebeam beginner or a seasoned expert, we all have gaps in our knowledge. Tuesday Tidbits will help you fill in those gaps. Every Tuesday, I’ll teach you simple techniques that you can learn in under 10 minutes and implement immediately to improve your workflow.
Intro
If you’ve ever wanted to create a curved line in Bluebeam, your first thought would be to try the Arc tool ![]() . While yes, this can draw a curved line, it’s definitely not your best option. It’s really difficult to define the exact curve shape and length that you want.
. While yes, this can draw a curved line, it’s definitely not your best option. It’s really difficult to define the exact curve shape and length that you want.
The two tools that have the most versatility when it comes to drawing multi-line segments, including curved lines, are the Polyline tool ![]() and the Polygon tool
and the Polygon tool ![]() . You can quickly and easily define the length of each segment and the angle of the arcs to create any shape you can think of. You can also add and subtract segments after you’ve already placed the shape.
. You can quickly and easily define the length of each segment and the angle of the arcs to create any shape you can think of. You can also add and subtract segments after you’ve already placed the shape.
The Cloud tool ![]() and the Cloud+ tool
and the Cloud+ tool ![]() function in a similar manner, but I won’t talk about those any further in this post. Just know that you can also do most of the things I’m talking about below with those tools.
function in a similar manner, but I won’t talk about those any further in this post. Just know that you can also do most of the things I’m talking about below with those tools.
Polyline and Polygon Basics
In case you’re not familiar, let’s cover the basics of how the Polyline tool ![]() and the Polygon tool
and the Polygon tool ![]() work.
work.
To Start
Select the tool you’d like to use:
- The Polyline tool
 creates one continuous line made of multiple segments.
 - The Polygon tool
 creates an enclosed shape with 3 or more sides. You can apply fill colors and hatch patterns to these shapes.
Click to place the start of the shape, then click once to place each vertex. When you’re done, you can hit Enter to finish the shape.
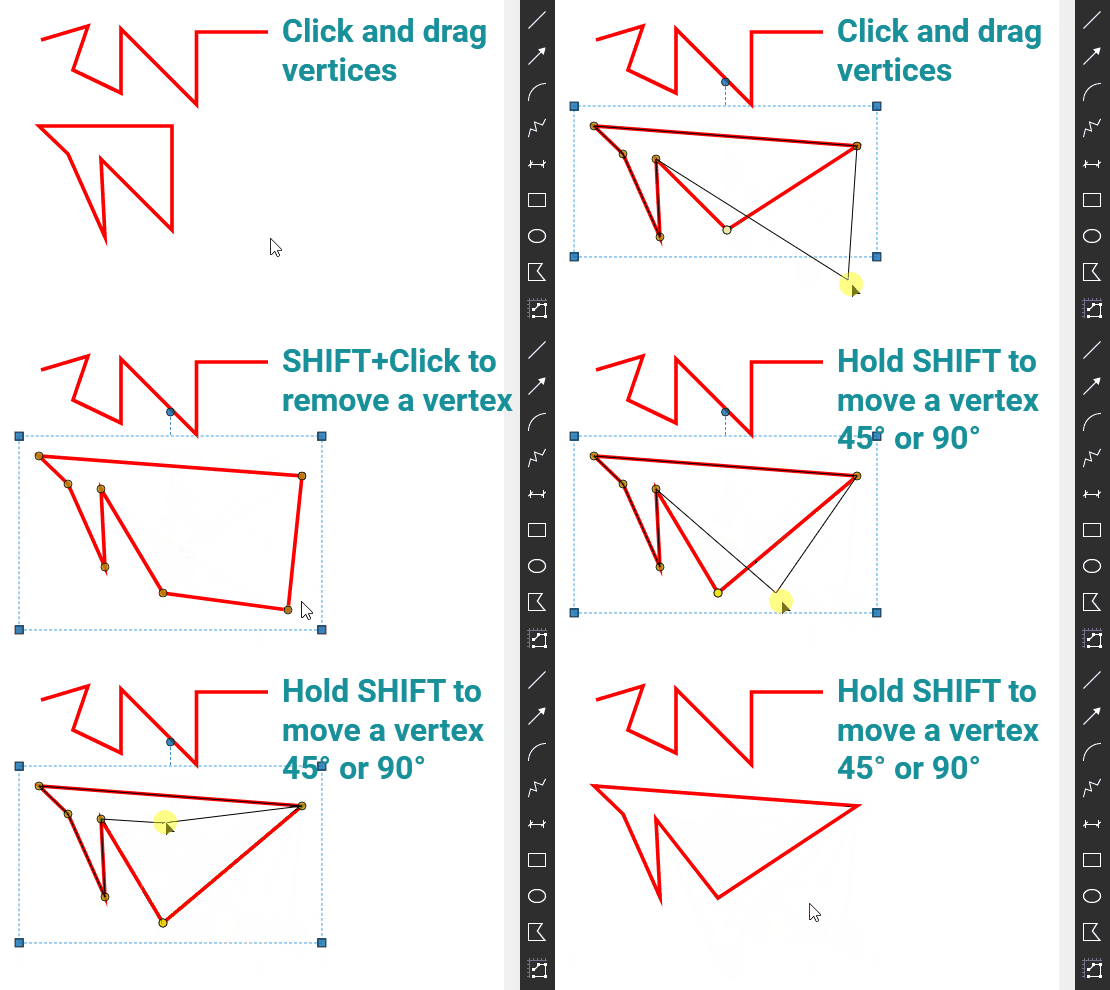
To create segments that are at 45° or 90° angles relative to the page, hold SHIFT before placing the next vertex.

Modifying Shapes
- Adding and removing vertices:
- To add: Select the markup, hold SHIFT and click in the middle of a segment.
- To remove: Select the markup, hold SHIFT and click on the vertex.
- Moving segments:
- Click and drag the little yellow grippy things (you probably already figured this out, but I wanted to be thorough).
Note: If you hold SHIFT while dragging a vertex, the vertex itself will move at 45° or 90° angles relative to its original location. It will not force the line segment to be at 45° or 90° angles, which is the behavior when first placing the line segment.

Creating Curved Lines (Finally!)
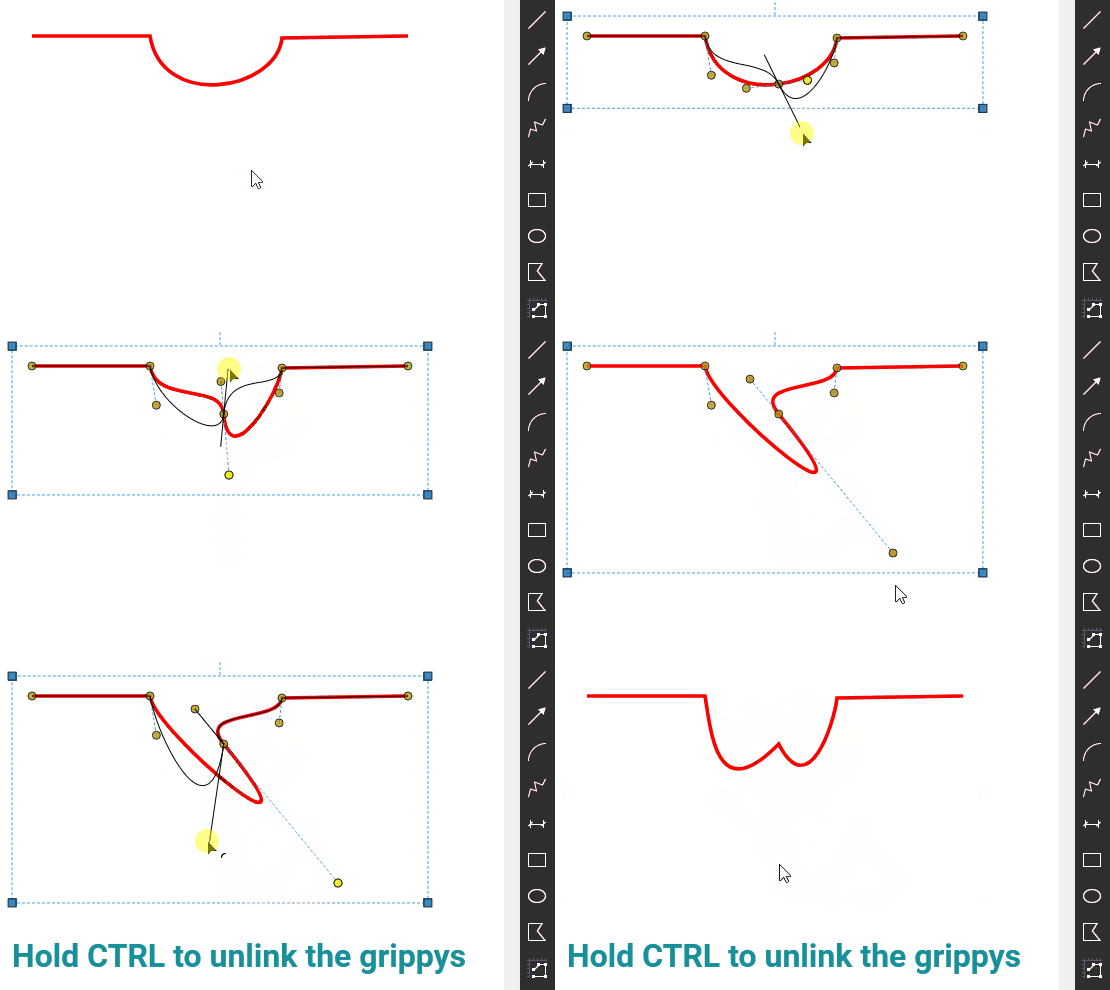
Now that you’ve sat through PolyTools 101, we can get on with why you’re actually here: to learn how to create curved lines. Here it is. Are you ready? Right-click on the line segment 🠖 Convert to Arc 🤯 (supposedly that’s the “mind blown” emoji…)
Once you’ve created an arc, you’ll see two more yellow grippys at the end of dashed lines appear at the vertices. These dashed lines are tangent to the end of the line segment where it meets the vertex (are you having flashbacks to grade school geometry class yet?). You can click and drag these yellow grippys to specify the angle and severity of the arc at each end of the segment. Play around with it a bit and you’ll see what I mean.

That’s it. Super super easy.
However, there are some important items to note:
- If you create multiple segments in a row while holding SHIFT, for some reason the Convert to Arc option can be greyed out. To fix this, just move the vertex any amount and the option to Convert to Arc comes back.

- If you create a new vertex on a curved segment, the resulting tangent yellow grippy things will be double ended and act together, forcing the line segments coming into that vertex to be coincident but the severity of the arcs can be adjusted independently. To make them independent from one another, hold CTRL and then click and drag either grip. (I explained this badly. Please just watch the GIF.)

- If you want to create a single curved line segment, similar to the Arc tool
 , you can do that by creating one segment using the Polyline tool
  and converting it to an arc. If this isn’t working for some reason, create a polyline with 3 segments, convert the middle segment into an arc, then delete the starting and ending vertices.
Bonus Tip
You can add arrows or other predefined shapes onto the start and end of the polyline if the regular Arrow tool ![]() is a little too plain Jane for you. These can be found in the markup settings, Start and End options.
is a little too plain Jane for you. These can be found in the markup settings, Start and End options.

Conclusion
This is one of my longer #TuesdayTidbits, so thanks for reading this far! I hope you found this tip useful. If there’s anything that was unclear or that you’d like me to go over in more depth, let me know in the comments!


The “Shift & Click” in the middle of a segment to add a point is a great addition to my tool box. I have a button on my toolbar to do the same thing, but not having to pan over to get it will be a real time saver!
Woo! Learning things that save time is the best! It’s amazing how much quicker you can move using keyboard shortcuts vs clicking buttons.
I have had to make odd shapes sometimes and found that a yellow grip at each end of a curve was harder to manipulate to get it into the right shape. if that’s the case I removed one of the curves yellow grippy things so that I only have one to deal with.
The ctrl to rotate separately got me!