Whether you’re a Bluebeam beginner or a seasoned expert, we all have gaps in our knowledge. Tuesday Tidbits will help you fill in those gaps. Every Tuesday, I’ll teach you simple techniques that you can learn in under 10 minutes and implement immediately to improve your workflow.
Intro
Did you know you can attach photos to markups within Bluebeam? If you’re an engineer or architect, it’s a great way to organize photos from a site visit. If you’re a contractor or field engineer, it’s a great way to send photos off-site to another office.
I’m sure there are many other creative ways to use this feature. If you have any suggestions, drop them in the comments!
Let’s Get to It
You can either attach an image saved on your computer or if your device has a built-in camera, such as a Microsoft Surface, you can attach a photo directly from the camera.
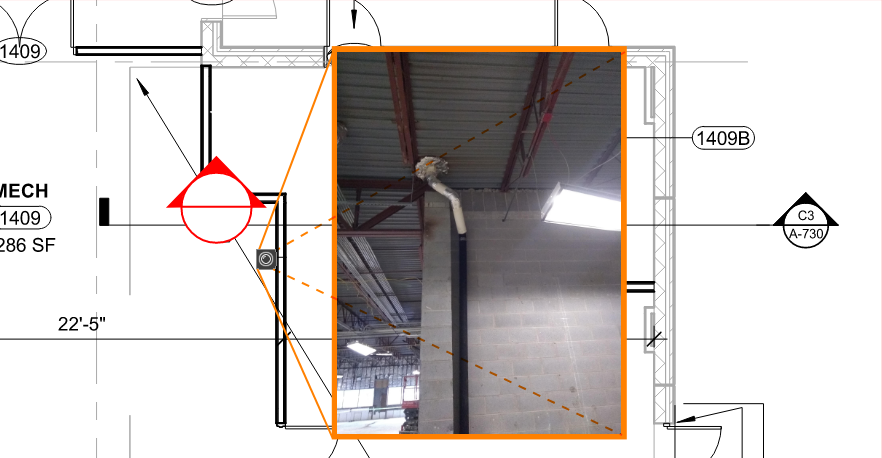
- First, make a markup. I like to use the Elevation View symbol, which I have in my toolchest. (We’ll go over toolchests at a later date, so stay tuned).
- Place the markup where you want it. For me this means placing it and rotating it to represent where I was standing and what direction I was facing when I took the picture.
- Select the markup.
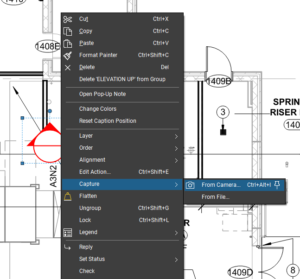
- Then there are multiple methods to attach a photo, so pick the one that works for you:
- Keyboard shortcut:
- i – from a file
- CTRL+SHIFT+i – from your device’s camera
- Right-click on the markup 🠖 Capture 🠖 From Camera or From File
- Keyboard shortcut:
-
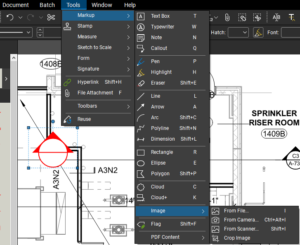
- Tools 🠖 Markup 🠖 Image 🠖 pick your poison
Once a photo is attached, you’ll see a little photo icon next to the markup ![]() . To view the image, simply click on the icon.
. To view the image, simply click on the icon.
And that’s it! Easy peasy.
Conclusion
As a structural engineer, I use this feature when I have a tablet with me on site visits. Since the tablet camera has a lower resolution, I do take the majority of photos with a good quality camera (the ability to zoom in later, amirite?). However, for those complicated areas that I just know are going to be confusing 3 weeks from now, being able to pinpoint those photos on plan is invaluable.
I would love to hear your ideas on how this feature might be useful to your job. Let me know in the comments!
Great tip Liz! Now I just need to make the time to go get some photos, or figure out how to get my superintendents to send them in…
Oof, good luck with that last bit. I’m rooting for ya!
I captured a bunch of images from a site walk on some as-builts but it doesn’t appear that they are visible in apps other than Bluebeam. Is there a way to make them universally available or am I just doing something wrong?
Thanks!
I don’t have Adobe, so I can’t test it. But I do know that Adobe and Bluebeam handle attachments differently. I’m sure how to access attached photos in Adobe.
create a capture summary and select the option to attach media as linked files, then that can be appended at the end of your document, just an idea.