
Whether you’re a Bluebeam beginner or a seasoned expert, we all have gaps in our knowledge. Tuesday Tidbits will help you fill in those gaps. Every Tuesday, I’ll teach you simple techniques that you can learn in under 10 minutes and implement immediately to improve your workflow.
Intro
The ability to filter markups in Bluebeam has been around a long time. But I don’t think nearly enough people know it exists, let alone actually use it regularly! Filtering can be a really powerful tool to help turn chaos into order when you have hundreds of markups in a single PDF.
All of my screenshots will be from Bluebeam 20. If you have an older version of Bluebeam, I’m going to direct you to the Bluebeam support website for their How-To guides. But you can still follow along with me here since the core functionality remains the same. The biggest difference you’ll notice is which buttons to click to turn filtering on.
- Bluebeam 2018 and 2019:
- Bluebeam 2017 and earlier:
Filtering Basics
Bring up your markups list. By default you can drag it up from the bottom or click the Markups ![]() button.
button.
If you’re using Bluebeam 20, you’ll see the Filter List ![]() button turn orange and a new, lighter colored row will appear above the header of each column. Let’s call these new headers the Filter Header.
button turn orange and a new, lighter colored row will appear above the header of each column. Let’s call these new headers the Filter Header.
If a column does not currently have a filter applied to it, the Filter Header will say “All”.


To apply a filter to a column, click the Filter Header and select the criteria you want. You can select more than one item per column, if you want. You can also apply different filters on any or all of the headers.
Any markups that don’t meet all of the filter requirements will be removed from the list and will become light gray on plan. If you’re in a Studio Session, no one else will see the filter because you’re not actually changing anything. It’s like putting on a pair of polarized sunglasses; you’ve only changed your view, not anyone else’s.
Advanced Filtering
If you want to get really tricksy, you can use the Custom filtering option. This gives you a lot more power to fine-tune your filter.
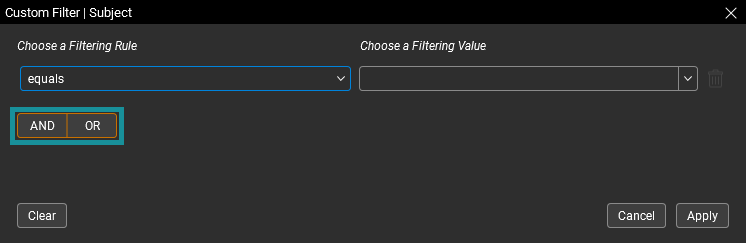
To access this feature, click the Filter Header and select Custom at the bottom. A new window will pop up that allows you to apply multiple criteria to the same column. Clicking the “AND” button means all criteria must be met, while clicking the “OR” button means any of the criteria can be met.
You can also apply more advanced filtering rules here. For instance, you can choose a markup that you don’t want to see. The full list of custom filtering rules are:
- Equals
- Does not equal
- Contains
- Does not contain
- Begins with
- Does not begin with
- Ends with
- Does not end with
I recently used the Custom Filter in a session with 5 different disciplines and a 200 page PDF. At the end of each day, I’d log into session and set a filter of:
- Author à Does not equal à Liz
- Date à Today
This gave me the ability to quickly figure out which comments I hadn’t seen yet and I could quickly scroll through them to figure out which ones were relevant to me.
Try combining the Custom Filter with sorting a column (just click on the darker header to sort) and you’ve got yourself a really quick way to drill down to the markups that you need.
Conclusion
I hope this gets you using the filter feature more, and I hope you share this tidbit with your coworkers.
Let me know in the comments or on social media how you use filters! I love seeing the creative solutions people come up with that I would never think of. You guys are so clever! 😊
I find filters are helpful when I don’t want to delete a takeoff markup that someone else created, but I can’t see the base layer because of the previously applied markup. Filtering so that I can only see my markups makes this easy!